
Giỏ hàng của bạn đang trống!
Danh mục sản phẩm
- KHUYẾN MÃI (22)
- Raspberry Pi 5 (22)
- SẢN PHẨM MỚI NHẤT (35)
- ASUS Tinker (51)
- Chơi âm thanh (6)
- Màn hình (51)
- Raspberry Pi 4 Model B (94)
- AI Computer and System on Module (55)
-
NVIDIA Jetson Nano Developer Kit (123)
- Module 4G/3G/2G/GNSS dành cho NVIDIA Jetson Nano (7)
- Màn hình LCD cho Jetson Nano (16)
- Robot dành cho Jetson Nano (2)
- Jetson AI Boards (27)
- Camera cho Jetson Nano (32)
- Nguồn cho Jetson Nano (14)
- Vỏ hộp và quạt tản nhiệt cho Jetson Nano (8)
- Module cho Jetson Nano (10)
- Phụ kiện khác cho Jetson Nano (17)
- LattePanda (38)
- BeagleBone (6)
- Raspberry Pi B+/Raspberry Pi2/Raspberry Pi3 (261)
- Raspberry Pi Zero (24)
- Module Boards (208)
- Modules cảm biến (113)
- Mạch Arduino (66)
- Mô hình Robot (20)
- Robot dành cho Raspberry Pi (8)
KHUYẾN MÃI


Arduino Due made in ITALY


Giá: 1,968,000 vnđ

Arduino Due
Từ 2022 MLAB có thêm website mlab.com.vn với nền tảng web mới hơn, dễ sử dụng hơn cho quý khách hàng tra cứu, đặt hàng online tại MLAB. Quý khách hàng có thể mua Arduino Due made in ITALY tại MLAB tại link: (link đặt hàng)

Arduino Due là một bo mạch vi điều khiển dựa trên CPU Atmel SAM3X8E ARM Cortex-M3. Đây là bo mạch Arduino đầu tiên dựa trên bộ vi điều khiển lõi ARM 32 bit. Nó có 54 chân Digital Input/Output (trong đó 12 chân có thể được sử dụng làm đầu ra PWM), 12 đầu vào analog, 4 UART (Hardware Serial Ports), xung nhịp 84 MHz, có khả năng kết nối USB OTG, 2 DAC (Digital to Analog) , 2 TWI, Jack nguồn, SPI Header, JTAG Header, Reset Button và Erase Button.
Warning: Không giống như hầu hết các bo mạch Arduino, bo mạch Arduino Do chạy ở mức điện áp 3,3V. Điện áp tối đa mà các chân I/O có thể chịu được là 3,3V. Đặt điện áp cao hơn 3,3V vào bất kỳ chân I/O nào có thể làm hỏng bo mạch.
Bo mạch có mọi thứ cần thiết để hỗ trợ vi điều khiển; chỉ cần kết nối nó với máy tính bằng cáp micro-USB hoặc cấp nguồn cho nó bằng bộ chuyển đổi AC-to-DC hoặc PIN dự phòng để bắt đầu. Do tương thích với tất cả các Arduino Shield hoạt động ở mức 3,3V và tương thích với sơ đồ chân Arduino 1.0.
The Due follows the 1.0 pinout:
- TWI: SDA and SCL pins that are near the AREF pin.
- IOREF: allows an attached shield with the proper configuration to adapt to the voltage provided by the board. This enables shield compatibility with a 3.3V board like the Due and AVR-based boards which operate at 5V.
- An unconnected pin is reserved for future use.
THÔNG SỐ KỸ THUẬT
| Microcontroller | AT91SAM3X8E |
| Operating Voltage | 3.3V |
| Input Voltage (recommended) | 7-12V |
| Input Voltage (limits) | 6-16V |
| Digital I/O Pins | 54 (of which 12 provide PWM output) |
| Analog Input Pins | 12 |
| Analog Output Pins | 2 (DAC) |
| Total DC Output Current on all I/O lines | 130 mA |
| DC Current for 3.3V Pin | 800 mA |
| DC Current for 5V Pin | 800 mA |
| Flash Memory | 512 KB all available for the user applications |
| SRAM | 96 KB (two banks: 64KB and 32KB) |
| Clock Speed | 84 MHz |
| Length | 101.52 mm |
| Width | 53.3 mm |
| Weight | 36 g |
SƠ ĐỒ NGUYÊN LÝ
Arduino Due is open-source hardware! You can build your own board using the following files:
EAGLE FILES IN .ZIP SCHEMATICS IN .PDF FRITZING IN .FZPZ BOARD SIZE IN .PDF
SƠ ĐỒ CHÂN KẾT NỐI

Download the full pinout diagram as PDF here.
Bắt đầu lập trình với Arduino Due
Bạn có thể tìm thấy trong phần Getting Started with Arduino Due tất cả thông tin bạn cần để định cấu hình các chân Pinout, sử dụng phần mềm Arduino (IDE) để bắt đầu code và nạp code cho ứng dụng của mình.
Power
The Arduino Due can be powered via the USB connector or with an external power supply. The power source is selected automatically.
External (non-USB) power can come either from an AC-to-DC adapter (wall-wart) or a battery. The adapter can be connected by plugging a 2.1mm center-positive plug into the board's power jack. Leads from a battery can be inserted in the Gnd and Vin pin headers of the POWER connector.
The board can operate on an external supply of 6 to 20 volts. If supplied with less than 7V, however, the 5V pin may supply less than five volts and the board may be unstable. If using more than 12V, the voltage regulator may overheat and damage the board. The recommended range is 7 to 12 volts.
The power pins are as follows:
- Vin. The input voltage to the Arduino board when it's using an external power source (as opposed to 5 volts from the USB connection or other regulated power source). You can supply voltage through this pin, or if supplying voltage via the power jack, access it through this pin.
- 5V.This pin outputs a regulated 5V from the regulator on the board. The board can be supplied with power either from the DC power jack (7 - 12V), the USB connector (5V), or the VIN pin of the board (7-12V). Supplying voltage via the 5V or 3.3V pins bypasses the regulator, and can damage your board. We don't advise it.
- 3V3. A 3.3-volt supply is generated by the onboard regulator. The maximum current draw is 800 mA. This regulator also provides the power supply to the SAM3X microcontroller.
- GND. Ground pins.
- IOREF. This pin on the Arduino board provides the voltage reference with which the microcontroller operates. A properly configured shield can read the IOREF pin voltage and select the appropriate power source or enable voltage translators on the outputs for working with the 5V or 3.3V.
Memory
The SAM3X has 512 KB (2 blocks of 256 KB) of flash memory for storing code. The bootloader is burned in a factory from Atmel and is stored in a dedicated ROM memory. The available SRAM is 96 KB in two contiguous banks of 64 KB and 32 KB. All the available memory (Flash, RAM, and ROM) can be accessed directly as a flat addressing space.
It is possible to erase the Flash memory of the SAM3X with the onboard erase button. This will remove the currently loaded sketch from the MCU. To erase, press and hold the Erase button for a few seconds while the board is powered.
Input and Output
- Digital I/O: pins from 0 to 53
- Each of the 54 digital pins on the Due can be used as an input or output, using pinMode(),digitalWrite(), and digitalRead() functions. They operate at 3.3 volts. Each pin can provide (source) a current of 3 mA or 15 mA, depending on the pin, or receive (sink) a current of 6 mA or 9 mA, depending on the pin. They also have an internal pull-up resistor (disconnected by default) of 100 KOhm. In addition, some pins have specialized functions:
- Serial: 0 (RX) and 1 (TX)
- Serial 1: 19 (RX) and 18 (TX)
- Serial 2: 17 (RX) and 16 (TX)
- Serial 3: 15 (RX) and 14 (TX) are Used to receive (RX) and transmit (TX) TTL serial data (with 3.3 V level). Pins 0 and 1 are connected to the corresponding pins of the ATmega16U2 USB-to-TTL Serial chip.
- PWM: Pins 2 to 13 Provide 8-bit PWM output with the analogWrite() function. the resolution of the PWM can be changed with the analogWriteResolution() function.
- SPI: SPI header (ICSP header on other Arduino boards) These pins support SPI communication using the SPI library. The SPI pins are broken out on the central 6-pin header, which is physically compatible with the Uno, Leonardo, and Mega2560. The SPI header can be used only to communicate with other SPI devices, not for programming the SAM3X with the In-Circuit-Serial-Programming technique. The SPI of the Due has also advanced features that can be used with the Extended SPI methods for Due.
- CAN: CANRX and CANTX These pins support the CAN communication protocol but are not yet supported by Arduino APIs.
- "L" LED: 13 There is a built-in LED connected to digital pin 13. When the pin is HIGH, the LED is on, when the pin is LOW, it's off. It is also possible to dim the LED because the digital pin 13 is also a PWM output.
- TWI 1: 20 (SDA) and 21 (SCL)
- TWI 2: SDA1 and SCL1. Support TWI communication using the Wire library. SDA1 and SCL1 can be controlled using the Wire1 class provided by the Wire library. While SDA and SCL have internal pullup resistors, SDA1 and SCL1 have not. Adding two pullup resistors on SDA1 and SCL1 lines is required for using Wire1.
- Analog Inputs: pins from A0 to A11 The Due has 12 analog inputs, each of which can provide 12 bits of resolution (i.e. 4096 different values). By default, the resolution of the readings is set at 10 bits, for compatibility with other Arduino boards. It is possible to change the resolution of the ADC withanalogReadResolution(). The Due’s analog input pins measure from the ground to a maximum value of 3.3V. Applying more than 3.3V on the Due’s pins will damage the SAM3X chip. The analogReference() function is ignored on the Due.
The AREF pin is connected to the SAM3X analog reference pin through a resistor bridge. To use the AREF pin, resistor BR1 must be desoldered from the PCB.
- DAC1 and DAC2 These pins provide true analog outputs with 12-bit resolution (4096 levels) with the analogWrite() function. These pins can be used to create an audio output using the Audio library.
Please note that the DAC output range is actually from 0.55 V to 2.75 V only.
Other pins on the board:
- AREF Reference voltage for the analog inputs. Used with analogReference().
- Reset Bring this line LOW to reset the microcontroller. Typically used to add a reset button to shields that block the one on the board.
See also the mapping between Arduino pins and SAM3X ports:
Communication
The Arduino Due has a number of facilities for communicating with a computer, another Arduino or other microcontrollers, and different devices like phones, tablets, cameras, and so on. The SAM3X provides one hardware UART and three hardware USARTs for TTL (3.3V) serial communication.
The Programming port is connected to an ATmega16U2, which provides a virtual COM port to software on a connected computer (To recognize the device, Windows machines will need a .inf file, but OSX and Linux machines will recognize the board as a COM port automatically). The 16U2 is also connected to the SAM3X hardware UART. Serial on pins RX0 and TX0 provides Serial-to-USB communication for programming the board through the ATmega16U2 microcontroller. The Arduino software includes a serial monitor which allows simple textual data to be sent to and from the board. The RX and TX LEDs on the board will flash when data is being transmitted via the ATmega16U2 chip and USB connection to the computer (but not for serial communication on pins 0 and 1).
The Native USB port is connected to the SAM3X. It allows for serial (CDC) communication over USB. This provides a serial connection to the Serial Monitor or other applications on your computer. It also enables the Due to emulate a USB mouse or keyboard to an attached computer. To use these features, see the Mouse and Keyboard library reference pages.
The Native USB port can also act as a USB host for connected peripherals such as mice, keyboards, and smartphones. To use these features, see the USBHost reference pages.
The SAM3X also supports TWI and SPI communication. The Arduino software includes a Wire library to simplify the use of the TWI bus; see the documentation for details. For SPI communication, use the SPI library.
Programming
The Due can be programmed with the Arduino Arduino Software (IDE). For details, see the reference and tutorials.
Uploading sketches to the SAM3X is different than the AVR microcontrollers found in other Arduino boards because the flash memory needs to be erased before being re-programmed. Upload to the chip is managed by ROM on the SAM3X, which is run only when the chip's flash memory is empty.
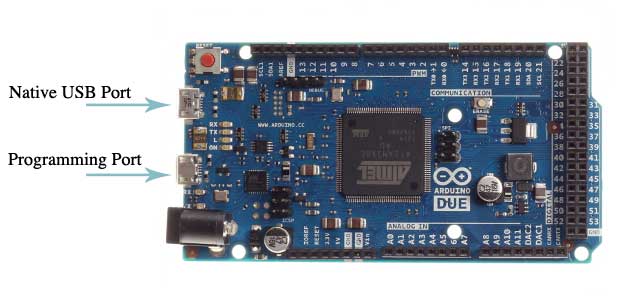
Either of the USB ports can be used for programming the board, though it is recommended to use the Programming port due to the way the erasing of the chip is handled :
- Programming port: To use this port, select "Arduino Due (ProgrammingPort)" as your board in the Arduino IDE. Connect Due's programming port (the one closest to the DC power jack) to your computer. The programming port uses the 16U2 as a USB-to-serial chip connected to the first UART of the SAM3X (RX0 and TX0). The 16U2 has two pins connected to the Reset and Erase pins of the SAM3X. Opening and closing the Programming port connected at 1200bps triggers a “hard erase” procedure of the SAM3X chip, activating the Erase and Reset pins on the SAM3X before communicating with the UART. This is the recommended port for programming the Due. It is more reliable than the "soft erase" that occurs on the Native port, and it should work even if the main MCU has crashed.
- Native port: To use this port, select "Arduino Due (NativeUSBPort)" as your board in the Arduino IDE. The Native USB port is connected directly to the SAM3X. Connect the Due's Native USB port (the one closest to the reset button) to your computer. Opening and closing the Native port at 1200bps triggers a 'soft erase' procedure: the flash memory is erased and the board is restarted with the bootloader. If the MCU crashed for some reason it is likely that the soft erase procedure won't work as this procedure happens entirely in software on the SAM3X. Opening and closing the native port at a different baud rate will not reset the SAM3X.
Unlike other Arduino boards which use Avrdude for uploading, the Due relies on bossac. The ATmega16U2 firmware source code is available in the Arduino repository. You can use the ISP header with an external programmer (overwriting the DFU bootloader). See this user-contributed tutorial for more information.
USB Overcurrent Protection
The Arduino Due has a resettable polyfuse that protects your computer's USB ports from shorts and overcurrent. Although most computers provide their own internal protection, the fuse provides an extra layer of protection. If more than 500 mA is applied to the USB port, the fuse will automatically break the connection until the short or overload is removed.
Physical Characteristics and Shield Compatibility
The maximum length and width of the Arduino Due PCB are 4 and 2.1 inches respectively, with the USB connectors and power jack extending beyond the former dimension. Three screw holes allow the board to be attached to a surface or case. Note that the distance between digital pins 7 and 8 is 160 mil (0.16"), not an even multiple of the 100 mil spacing of the other pins.
The Arduino Due is designed to be compatible with most shields designed for the Uno, Diecimila, or Duemilanove. Digital pins 0 to 13 (and the adjacent AREF and GND pins), analog inputs 0 to 5, the power header, and the "ICSP" (SPI) header are all in equivalent locations. Further, the main UART (serial port) is located on the same pins (0 and 1). Please note that I2C is not located on the same pins on the Due (20 and 21) as the Duemilanove / Diecimila (analog inputs 4 and 5).
Viết đánh giá
Họ và tên:Đánh giá của bạn: Lưu ý: Không hỗ trợ HTML!
Bình chọn: Xấu Tốt
Nhập mã bảo vệ: