
Giỏ hàng của bạn đang trống!
KHUYẾN MÃI


Đo nhiệt độ - độ ẩm, hiện thị trên LCD và lưu dữ liệu vào thẻ nhớ SD sử dụng module DHT-11, Micro SD, RTC BQ32000
1. Giới thiệu
Xin chào các bạn! Hôm nay mình sẽ hướng dẫn các bạn cách đọc nhiệt độ - độ ẩm sau đó xuất ra màn hình LCD nhiệt độ - độ ẩm cùng với thời gian thực và lưu dữ liệu thu được vào thẻ SD. Hy vọng thông qua bài viết này sẽ giúp các bạn trên con đường thực hiện những dự án của riêng mình!
2. Nội dung chính
- Đọc nhiệt độ - độ ẩm từ module cảm biến DHT-11
+ Hiện thị ngày giờ và nhiệt độ độ ẩm lên LCD.
+ Cứ sau 10s lưu dữu liệu vào thẻ nhớ SD.
- Ứng dụng: Sử dụng để theo dõi nhệt độ - độ ẩm cho: kho lạnh, xe đông lạnh, tủ vacxin, phòng máy chủ/server, … Sử dụng dữ liệu đã lưu để vẽ biểu đồ nhiệt độ - độ ẩm phục vụ cho công tác nghiên cứu.
3. Chuẩn bị phần cứng
a) KIT Arduino UNO VN01
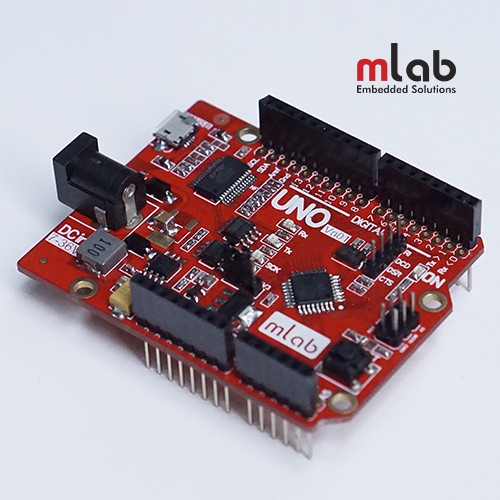
Đặc điểm kỹ thuật:
- Sử dụng vi điều khiển Atmega328P-AU
- Nguồn cấp đầu vào dải rộng 7-36VDC
- Tạo ra nguồn ouput 5V/2A và 3.3V/800mA
- Lựa chọn được nguồn cấp cho Atmega328P là 5V/3.3V
- Tương thích với Arduino Uno và Arduino IDE
- 14 chân I/O số (6 chân output PWM)
- 6 chân Analog
- Flash Memory: 32K
- RAM: 2K
- EEPROM: 1K
- Clock: 16Mhz
Link tham khảo: http://mlab.vn/mach-arduino/1697809-uno-vn01-arduino-uno-phien-ban-viet-nam.html
b) LCD 1206 Keypad shield MLAB
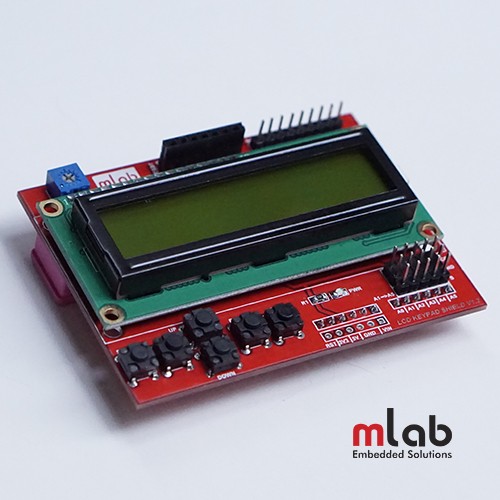
Đặc điểm kỹ thuật:
- Điện áp hoạt động : 5VDC
- 5 nút nhấn cho người sử dụng tùy chọn làm các nút menu điều khiển
- Nút RST dùng để reset chương trình cho Arduino
- Có biến trở để điều chỉnh độ tương phản của LCD
- Mở rộng thêm các I/O mà arduino không dùng để điều khiển LCD
- Mở rộng các thêm các chân ADC để có thể kết nối dễ dàng với các cảm biến
- Kích thước:82x62mm
Link tham khảo: http://mlab.vn/mach-arduino/980100-lcd-1206-keypad-shield-mlab.html
c) Module cảm biến DHT-11
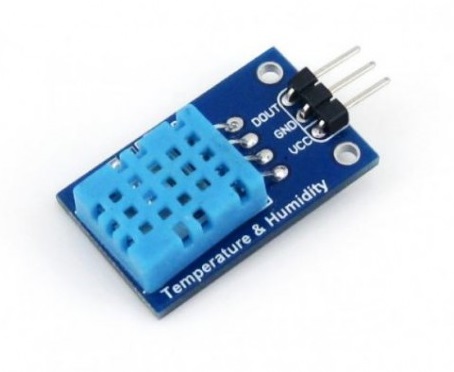
Đặc điểm kỹ thuật:
+ Nhiệt độ:
- Độ phân giải: 1°C
- Độ chính xác: ±2℃
- Dải đo: 0°C ~ 50°C
+ Độ ẩm:
- Độ phân giải: 1%RH
- Độ chính xác: ±5%RH (0~50°C)
- Dải đo: 20%RH ~ 90%RH (25°C)
+ Điện áp hoạt động: 5VDC
+ Điều kiện hoạt động đề nghị:
- Nhiệt độ: 10°C ~40°C
- Độ ẩm: 60%RH hoặc thấp hơn
Link tham khảo: http://mlab.vn/module-boards/module-cam-bien/1737124-module-cam-bien-nhiet-do-do-am-dht11.html
d) Module thời gian thực BQ32000
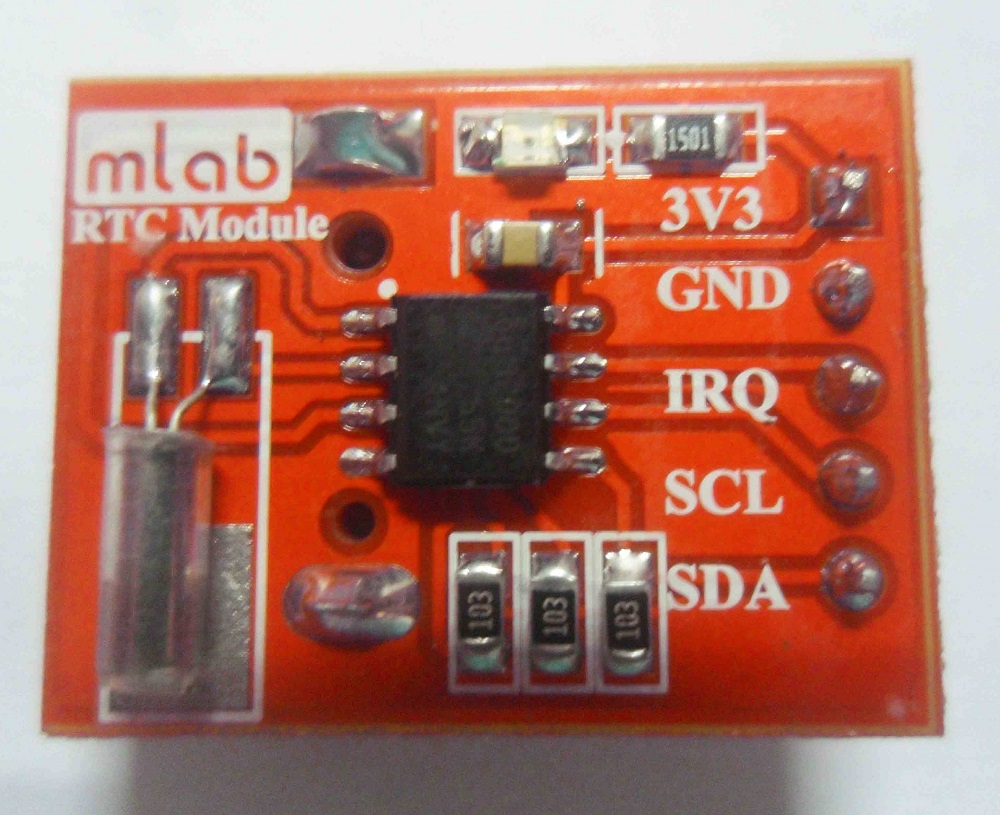
Đặc điểm kỹ thuật:
- Điện áp hoạt động : 3V - 3.6V.
- Sử dụng IC thời gian thực BQ32000 (TexasInstruments)
- Giao tiếp I2C hỗ trợ tới 400 Khz.
- Tự động chuyển sang nguồn Pin (3V) khi mất điện.
Link tham khảo: http://mlab.vn/28900-module-rtc-bq32000.html
e) Module Micro SD
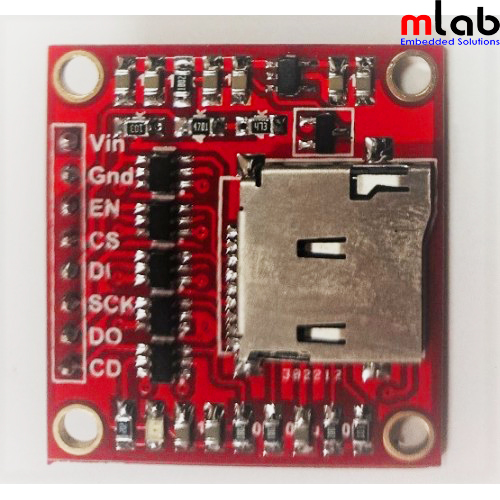
· Đặc điểm kỹ thuật:
- Điện áp hoạt động: 5V.
- Giao tiếp: SPI
- MOSI, MISO, CLK, CS kết nối tương ứng với các chân MOSI, MISO, CLK, CS của MCU để giao tiếp với thẻ nhớ.
- EN: Chân điều khiển bật/tắt nguồn cho Module, EN ở mức cao/mức thấp tương ứng với nguồn cấp cho Module là bật/ tắt. Nếu không dùng chức năng bật/tắt nguồn cho Module thì chân EN phải được nối với VIN qua jumper.
Link tham khảo: http://mlab.vn/184900-module-micro-sd.html
4. Kết nối phần cứng

* LCD Keypad Sheild Mlab đã được tích hợp sẵn jump phù hợp với Arduino nên chỉ cần cắm lên Kit Arduino là sử dụng được và các chân còn thừa sẽ được đưa ra.
* Module cảm biến DHT11
|
DHT11 |
Arduino |
|
Vcc |
5V |
|
GND |
GND |
|
Dout |
Pin 2 |
* Module Micro SD
|
Micro SD |
Arduino |
|
Vcc |
5V |
|
GND |
GND |
|
DI |
Pin 11 |
|
SCK |
Pin 13 |
|
DO |
Pin 12 |
|
CS |
Pin 3 |
* Module RTC BQ32000
|
RTC BQ32000 |
Arduino |
|
Vcc |
5V |
|
GND |
GND |
|
SCL |
Pin A5 |
|
SDA |
Pin A4 |
5. Lập trình
Đầu tiên ta cần cài thời gian cho Module RTC 32000.
Lưu ý trước khi thực hiện việc set up thời gian này các bạn cần phải cài đặt thời gian trong máy tính của bạn chuẩn, bởi vì Module sẽ lấy thời gian ở đấy để set up. Đây là một số link serve thời gian thực để các bạn tiện theo dõi:
https://time.is/H%C3%A0_N%E1%BB%99i,_H%C3%A0_Nam
https://www.timeanddate.com/time/zone/vietnam/hanoi
Sau đó ta nạp chương trình sau đây:
1 2 3 4 5 6 7 8 9 10 11 12 13 14 15 16 17 18 19 20 21 22 23 24 25 26 27 28 29 30 31 32 33 34 35 36 37 38 39 40 41 42 43 44 45 46 47 48 49 50 51 52 53 |
#include <Wire.h> #include "RTClib.h" RTC_DS1307 rtc; int time_error = 4; char daysOfTheWeek[7][12] = {"Sunday", "Monday", "Tuesday", "Wednesday", "Thursday", "Friday", "Saturday"}; void setup () { while (!Serial); // for Leonardo/Micro/Zero Serial.begin(57600); if (! rtc.begin()) { Serial.println("Couldn't find RTC"); while (1); } rtc.adjust(DateTime(F(__DATE__), F(__TIME__))); DateTime now = rtc.now(); Serial.print(now.year(), DEC); Serial.print('/'); Serial.print(now.month(), DEC); Serial.print('/'); Serial.print(now.day(), DEC); Serial.print(" ("); Serial.print(daysOfTheWeek[now.dayOfTheWeek()]); Serial.print(") "); Serial.print(now.hour(), DEC); Serial.print(':'); int time_minute = now.minute(); int time_second = now.second(); int time_ok = 0; if(time_second >= (60 - time_error)){ time_ok = time_error + time_second - 60; Serial.print(time_minute + 1); Serial.print(":"); Serial.print(time_ok); } else { Serial.print(now.minute()); Serial.print(":"); Serial.print(time_second + time_error); } Serial.println(); delay(1000); } void loop () { } |
Sau khi nạp xong chương trình trên vào Arduino, ta nạp tiếp chương trình:
1 2 3 4 5 6 7 8 9 10 11 12 13 14 15 16 17 18 19 20 21 22 23 24 25 26 27 28 29 30 31 32 33 34 35 36 37 38 39 40 41 42 43 44 45 46 47 48 49 50 51 52 53 54 55 56 57 58 59 60 61 62 63 64 65 66 67 68 69 70 71 72 73 74 75 76 77 78 79 80 81 82 83 84 85 86 87 88 89 90 91 92 93 94 95 96 97 98 99 100 101 102 103 104 105 106 107 108 109 110 111 112 113 114 115 116 117 118 119 120 121 122 123 124 125 126 127 128 129 130 131 132 133 134 135 136 137 138 139 140 141 142 143 144 145 146 147 148 149 150 |
#include <DHT.h> #include <LiquidCrystal.h> #include <SPI.h> #include <SD.h> #include <Wire.h> #include <RTClib.h> LiquidCrystal lcd(8, 9, 4, 5, 6, 7); RTC_DS1307 rtc; int time_error = 6; // Tùy chỉnh sai số cho Module RTC BQ32000 char daysOfTheWeek[7][12] = {"Sunday", "Monday", "Tuesday", "Wednesday", "Thursday", "Friday", "Saturday"}; const int DHTPIN = 2; //Đọc dữ liệu từ DHT11 ở chân 2 trên mạch Arduino const int DHTTYPE = DHT11; //Khai báo loại cảm biến DHT dht(DHTPIN, DHTTYPE); byte degree[8] = { 0B01110, 0B01010, 0B01110, 0B00000, 0B00000, 0B00000, 0B00000, 0B00000 }; File myFile; void setup() { Serial.begin(9600); lcd.begin(16, 2); // Khởi động LCD lcd.setCursor(0,0); // Đặt vị trí cho con trỏ LCD lcd.print("mlab.vn"); lcd.createChar(1, degree); if (! rtc.begin()) { Serial.println("Couldn't find RTC"); while (1); } dht.begin(); // Khởi động cảm biến DHT11 while (!Serial) { ; // wait for serial port to connect. } Serial.print("Initializing SD card..."); if (!SD.begin(3)) { Serial.println("initialization failed!"); return; } Serial.println("initialization done."); } void loop() { DateTime now = rtc.now(); int time_minute = now.minute(); int time_second = now.second(); int time_ok = 0; if(time_second >= (60 - time_error)){ time_ok = time_error + time_second - 60; time_minute = time_minute + 1; time_second = time_ok; } else { time_second= time_second + time_error; } float h = dht.readHumidity(); //Đọc độ ẩm float t = dht.readTemperature(); //Đọc nhiệt độ // kiểm tra lại giá trị nhiệt độ và độ ẩm đọc được, nếu chúng là "NaN" ( not a number) thì có vấn đề if (isnan(t) || isnan(h)) { Serial.println("Failed to read from DHT"); } else { Serial.print("Humidity: "); Serial.print(h); Serial.print(" % "); Serial.print("Temperature: "); Serial.print(t); Serial.println(" *C"); } //Mở File myFile = SD.open("TempHum.txt", FILE_WRITE); // Viết dữ liệu vào File if (myFile) { if( time_second%10==0&& time_second/10!=0 || time_second==0) { myFile.print("Ngay: "); myFile.print(now.day()); myFile.print("/"); myFile.print(now.month()); myFile.print("/"); myFile.print(now.year()); myFile.print(" "); myFile.print("Thoi diem: "); myFile.print(now.hour()); myFile.print(":"); myFile.print(time_minute); myFile.print(":"); myFile.print(time_second); myFile.print(" "); myFile.print("Nhiet do: "); myFile.print(t); myFile.print("*C "); myFile.print("Do am: "); myFile.print(h); myFile.println("%"); myFile.close(); } //đóng file : myFile.close(); } else { // Nếu lỗi mở File, in thông báo ra Serial Serial.println("error opening data file"); } // Hiển thị thông in lên LCD lcd.setCursor(0,0); lcd.print(now.day()); lcd.print("/"); lcd.print(now.month()); lcd.print("/"); lcd.print(now.year()); lcd.print(" H"); lcd.print(":"); lcd.print(round(h)); lcd.print("% "); lcd.setCursor(0,1); lcd.print(now.hour()); lcd.print(":"); lcd.print(time_minute); lcd.print(":"); lcd.print(time_second); lcd.print(" T"); lcd.print(":"); lcd.print(round(t)); lcd.write(1); lcd.print("C "); } |
Link tải thư viện:
RTClib : https://github.com/adafruit/RTClib
Dht: https://github.com/adafruit/DHT-sensor-library
Tham khảo:
https://www.arduino.cc/en/Reference/LiquidCrystal
https://www.arduino.cc/en/Reference/SPI
https://www.arduino.cc/en/Reference/SDCardNotes
https://www.arduino.cc/en/Reference/Wire
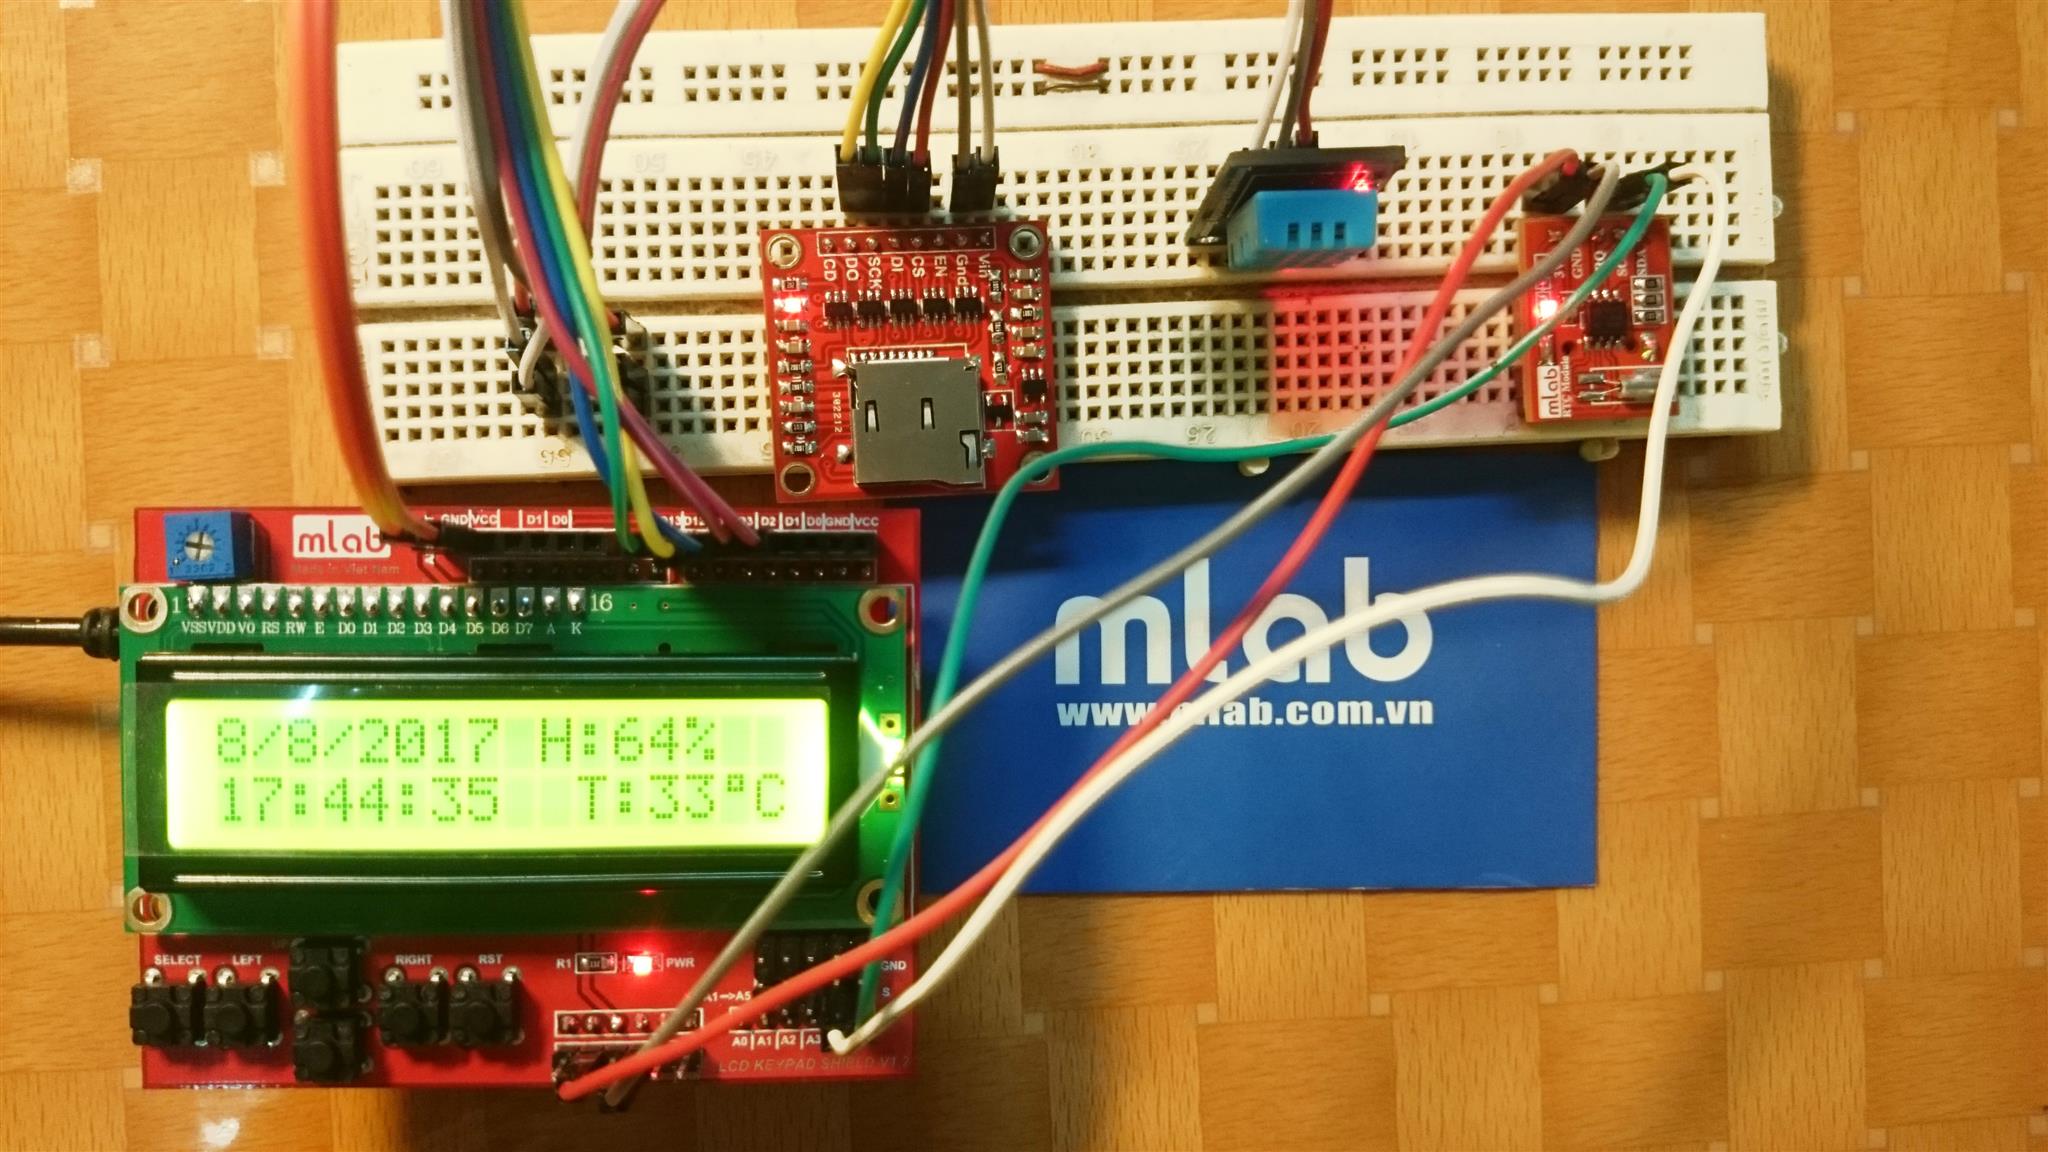
6. Kết quả
Và đây là kết quả:
Tác giả bài viết : thích ăn mỳ
Chỉnh sửa và up bởi : Seven
Nếu có bất kì khó khăn gì các bạn hãy để lại ở phần bình luận phía dưới, chúng tôi sẽ giải đáp những thắc mắc cho các bạn. Chúc các bạn thành công!
Viết đánh giá
Họ và tên:Đánh giá của bạn: Lưu ý: Không hỗ trợ HTML!
Bình chọn: Dở Hay
Nhập mã bảo vệ: